Free help: USER GUIDE
Home > Clients & Profits X User Guide > Accounting > Printing Invoices

|
Clients & Profits X Online User Guide |
Client Invoices can be printed any time after they are posted.
Invoices can be printed individually, or in batches
for a range of invoice numbers. A batch of invoices can also
be printed for the same client and a range of invoice dates;
this option lets you print the month’s invoices for one
client quickly and easily.
The printed invoice shows
the line items, billing amounts, descriptions, and notes you’ve
entered into the invoices. Each invoice can have its own set of options
and settings (e.g., display options, group and sort, show or hide totals,
etc.) that affect the look of the billing. So printing a large number
of invoices at the same time may show a wide variety of invoice styles.
Invoices are designed to print on your letterhead. The invoice margins
are customizable, and can be set by choosing Invoice Options from the
Preferences pop-up menu. None of the invoice’s options can be changed
at the time invoices are printed. To change these options you must make
your changes first, then print the invoice. The optional agency billing
address is printed from Agency Information, where it can be changed.
An invoice can
be printed then reprinted any number of times. As an option, a job cost
report can be printed showing costs billed on these invoices. This invoice
detail report can be used to back up the billing amounts on invoices,
if you bill strictly based on costs. If you bill for more than your costs,
don’t print this report -- your client will wonder why you’re
overbilling them.
Unposted invoices will print if they are part of the selection, but will be printed as “billing previews” until they are posted.
To print client invoices
1 Click on the print Invoices button, or choose File > Print Invoices.


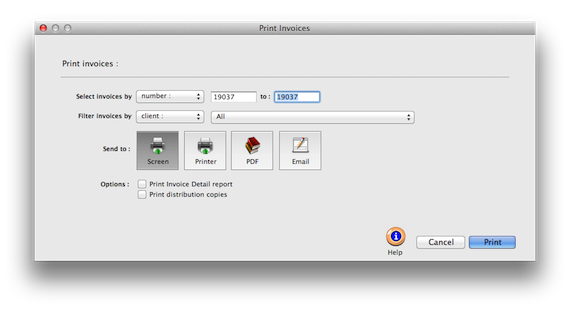
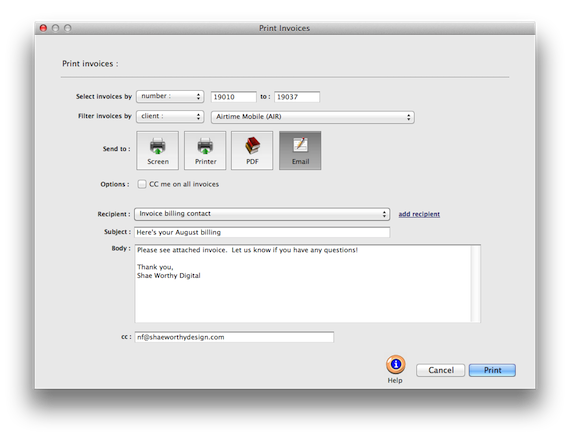
The Print Invoices window lets you select a batch of invoices selected by invoice number (e.g., 6006 - 6015), one particular client, and a range of invoice dates. The currently display invoice’s number is entered by default, but can be changed.
2 Enter a range of invoice numbers and an optional client number.
Any invoice numbered within the range of numbers you enter will be printed (or reprinted, in some cases). Enter a client number to print only invoices added for one client; the option is useful when a client asks for a reprint of the month’s billings.
Invoices may be printed either by Client or by AE/Team. Choose which you wish to print from the ... and for drop-down menu.
3 Enter an optional range of invoice dates and options.
The currently displayed invoice’s date is entered by default. Use this option only when you need to print a set of invoices added on the same day or within the same time period.
Use the print invoice detail report option to include a copy of the job cost report with each invoice. Since job costs and billing amounts are linked, your clients can easily see the costs billed specifically on an invoice. The Invoice Detail Report shows gross amounts only, so clients won’t actually see what the agency paid for the job’s costs.
Since each invoice can contain up to five distribution names, up to five copies of an invoice can be printed automatically. Since laser printers don’t handle multi-part forms, Clients & Profits X prints the distribution name (e.g., Acct Exec, Client, Job Jacket, etc.) at the bottom of each invoice.
When your print destination is selected to print to anything other than a physical printer (i.e. E-Mail, PDF, etc.) the print distribution copies checkbox will remain dimmed. To enable the print distribution copies option, choose File > Print Destination > Printer.
4 Click Print.
Since an invoice can be reprinted many times, be careful not to mail out duplicate copies of the same invoice just because it printed again.
|
Printing distribution copies If the Print distribution copies checkbox is greyed out, not giving you the option to print more than one copy of the invoice, it is likely that your print destination is set to something other than printer. To change this setting, cancel out of the print invoices window, then choose File > Print Destination, and choose Printer from the print destination list. Click the Print Invoices button again, and the Print distribution copies checkbox will be active, giving you the option to print distribution copies.
|
To print an estimate as a PDF file
For clients or shops that like to have their
estimates e-mailed to them, Adobe Acrobat allows you to save
an estimate as a PDF file on your hard drive, your shop's file
server, or the client's web server. Creating PDF files from Clients & Profits
is nearly as easy as printing on paper, and involves only a few
extra steps. The hardest thing about creating PDF files is choosing
a name, since each estimate you save will have its own unique
file name (such as, JOB101EST.PDF). You can choose any kind of
name for your Acrobat files, but they all must end with .PDF.
1 Choose File > Print Destination > PDF.
2 From the estimate window, click the Print button.
The Print Job Estimates window opens, prompting you to enter the job
number you wish to print the estimate for, as well as amounts, etc.
3 Click Print.
4 A dialog will appear, asking you to name and save the PDF
file to your hard drive. After you have finished, click save.