Free help: USER GUIDE
Home > Clients & Profits X User Guide > Setup > Asset Manager Preferences

|
Clients & Profits X Online User Guide |
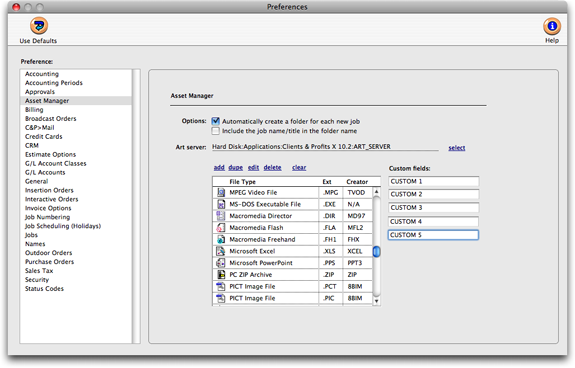
The asset manager preferences window contains settings that enable creative and production staff members to use Clients & Profits to track digital art files for jobs
The settings in asset manager preferences tell Clients & Profits where your shop's digital assets are stored. It lets you name the location of the shop's art server, which is required for the asset manager to work. The Preferences window for the Asset Manager identifies the file type, server path, and other customizable information for job assets. When you click this option for the first time, Clients & Profits will prompt you to create a job folder on the art server for any open job. If you want to automatically create art folders for your existing jobs, click Yes. To skip adding these folders, click No. (You can also add the job folders later by making new folders manually on the art server. Be sure to name them with the job numbers exactly as they appear in Clients & Profits.)
With the database path defined, Clients & Profits X can create a job assets folder for every new job, creating a place to store assets so there’s no more searching for misplaced (or worse, lost) job files. You can store any type of file in the job assets folder--whether it is a graphics file, word processing, or spreadsheet--then load it right from Clients & Profits X. In order to work properly, the job assets folder must be a folder. It can't be a root level of your computer's hard disk.
Anyone with manager-level access can change the asset manager preferences. These settings are system-wide preferences, so they affect every user.
These system-wide settings can be changed:
Automatically create a folder for each job Checking this option tells Clients & Profits X to automatically create a folder on the art server each time a new job ticket is saved. The new job's folder will be named with the job's number. There can be only one art server.
Art server This is the name and location of the file server that's used for storing the shop's digital files. It tells Clients & Profits X where to look for the job's files, so it is required for asset management. The full path to the art server (including the drive name and sub-directories, if applicable) must be included. The art server name is case-sensitive. If the art server entered here isn't found, you'll be prompted to reenter the name.
Custom fields These optional data fields supplement the information saved for each job asset. The names of the custom fields are by the system manager and apply to every client and job and their digital artwork, but can be customized for individual assets. One, some, or all of the custom fields can be used. These fields can be used to print custom reports listing the shop's artwork and production elements.
File types The file types list contains icons, extensions, and creator codes for the most commonly-used design programs for Windows and Macintosh. Clients & Profits lists the selected job's files from the art server when the Asset Manager window opens, looking up each file's icon from the file types table. File types are identified by their extension (in Windows) or creator code (on the Mac). You can add additional file types for the programs you use that aren't listed by clicking the add link.
File types are needed to display an icon for each type of digital file in the Asset Manager window. As your shop adopts new programs for design and production, you should add their file types to the asset manager preferences.
When a new database is created (or when your database is upgraded), the standard file types and their icons are loaded automatically when a new database is created, or when an existing database is upgraded to Clients & Profits 5.0.
To add a new file type
1 Click the add link,
The Asset File Type window opens, prompting you to enter the new file type's details.
2 Enter the file type's extension (e.g., .PDF) or click on the Get file link to select the file type from your hard disk or file server. The extension will identify the file type for your Windows users.
3 Enter file type's creator (e.g., CARO) or click the Get application link to select the file type.
The creator code identifies the file type for your Macintosh users. The creator code is not part of the file name, unlike the extension in Windows, but embedded inside the file. When you select an application from your hard disk, Clients & Profits X copies the application's creator code automatically.
4 Enter the application name, or press Tab to leave it.
5 Paste the file's icon into the Icon field.
The size of the Icon field is 14 pixels wide by 14 pixels high. You'll need to use a screen capture program and an image editor to grab and resize the file type's small icon, which shouldn't exceed the size of the Icon field's borders. If so, users won't see the entire icon in the Asset Manager window. If no icon is entered, a generic one will be displayed in the Asset Manager window instead.
6 Click Save.
Once the file type is saved, it is available immediately to any Clients & Profits X user.
To duplicate an existing file type
Duplicating a file type copies its creator, application name, and icon onto a new file type. It's a shortcut for using the same icon for several different file types used by the same application.
1 Click once on a file type to select it then click the dupe link.
2 Enter the new type's extension and other information (if needed), then click Save.
To edit a file type
1 Double-click on the file type from the asset manager preference window, or click once on a file type to select it then click the edit link.
2 Make your changes, then click Save.
To delete a file type
Deleting a file type removes it from the Clients & Profits X asset manager. File types can be deleted when you no longer use a particular application, or someone adds a file type by mistake. Deleting a file type doesn't prevent its files from being displayed in the Asset Manager window; instead, it just won't have any information about the file.
1 Click once on a file type to select it then click the delete link.