Free help: USER GUIDE
Home > Clients & Profits X User Guide > Setup > Job Numbering

|
Clients & Profits X Online User Guide |
Automatic job numbering is great time-saver
Jobs are numbered sequentially as they are opened, eliminating the old manual job log. Automatic job numbering is an option, however, so you can still number jobs manually if needed.
Jobs can be automatically numbered in many ways, based on settings in the Job Numbering preferences window. Job numbers can be comprised of the year, a client number, a sequential number (which is automatically incremented), and a separator. One or more of these parts can be included in your job number. Generally, you can’t mix automatic job numbers with manually-entered job numbers. Automatic job numbering is a system-wide setting. This means all jobs will be numbered automatically, or not. When you make an automatic numbering setting, it applies to all users who open new jobs.

The most important part of the automatic job number is the sequential number. This number identifies one job from another, so it must be unique. The sequential number can be calculated using a system number or a client number, for flexibility. The automatic job numbering settings can be changed as needed, without changing existing job numbers. If you change the numbering method at some point, however, your job lists will show both jobs with the old numbers and the new numbers -- which may confuse some people. The Always prevent duplicates option keeps the same job number from being used twice on different job tickets.
The job number can’t exceed ten letters, numbers, and characters.
If you’ve set your automatic job numbering to number sequentially by client, then each client needs a job number setting. The client’s job number setting is the last number used on an open job; it will be incremented by one on the next job added for the client. If you don’t enter a client’s job number, the next number will be 001.
To change your job numbering settings
1 Choose Clients & Profits X > Preferences (Mac) or Setup > Preferences (Windows), then select Job Numbering from the list on the left.
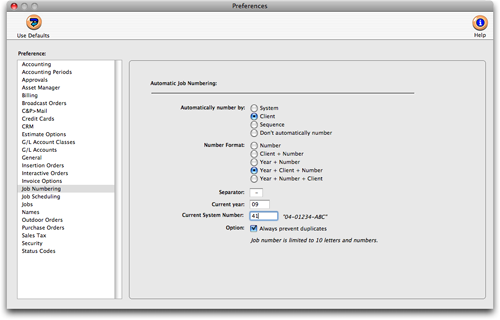
The Job Numbering preferences window will appear.
2 Change your job numbering settings. When you are finished, simply close the window and the changes you've made will be saved..
The Automatically number by setting numbers jobs using a system number or a client number. The Number format determines how the automatic job number is assembled: To use the sequential number only, choose Number; to include the client number, choose Client + Number; to include the year, choose Year + Number; to use the year and the client number, choose Year + Client + Number; or, to include the year, then the sequential number, then the client number, choose Year + Number + Client. You’ll see an example of the job numbering format after choosing an option. The separator is a single character that separates the different parts (i.e., year, client, sequential number) of the job number. You can use any character, such as a dash, colon, or slash. Or, you can leave it blank (this option lets your job numbers contain more digits). The current year contains the two-digit year (e.g., 98).
To number your jobs manually
While automatic job numbering is practical and efficient, you may decide to use your manual numbering system instead. In this case, ignore all of the automatic job numbering settings. When a job is opened, it will be numbered automatically -- just ignore this number then enter your own number.
To renumber an automatically-numbered job
Sometimes the automatic job number just isn’t what you want. It’s easy to change a job number:
1 Choose Setup > Utilities > Re-number.
2 Select Job Number from the re-number pop-up menu.
3 Enter the old job number in the "Change job number from" field, then press tab.
4 Enter the new job number -- the one you really want -- in the "to job number" field.
5 Click OK.
Clients & Profits X will change the job’s number, as well as costs, time, change orders, and other activity that has been added for the job. Renumbering a job is fast, and other users don’t have to stop working.