Free help: USER GUIDE
Home > Clients & Profits X User Guide > Accounting > Auto-pay Payables

|
Clients & Profits X Online User Guide |
The Auto-Pay Payables function automatically writes checks for unpaid vendor invoices
Invoices are selected by pay date, which is entered
in Accounts Payable when invoices are added. Clients & Profits
X then searches for every unpaid invoice through this pay date,
groups them by vendor, then writes a check.
Each vendor gets one check for its unpaid invoices. There’s no difference
between an automatically-written check and one you’ve added yourself.
These checks aren’t posted, so they can be proofed and edited (or
even deleted) before posting.
The Auto-pay function writes checks for selected payables, paying off
the invoices automatically. Invoices selected for payment show their
balance due, but usually don’t include a payment amount. This option
calculates the payment amount as the balance due. It’s faster than
entering the payment amounts manually, but only if you intend to pay
all of your invoices at once.
The select only A/Ps paid by clients option allows you to just select
the A/P invoices that have been billed to a client and the client’s
payment has been received.
Don’t worry about automatic checks getting out of control. Clients & Profits X gives you complete control over how much is paid to each invoice and vendor. Plus, the checks aren’t finalized until they are proofed and posted.
To automatically write checks for unpaid payables
1 From the Accounts Payable window, choose Edit > Auto-pay Payables.
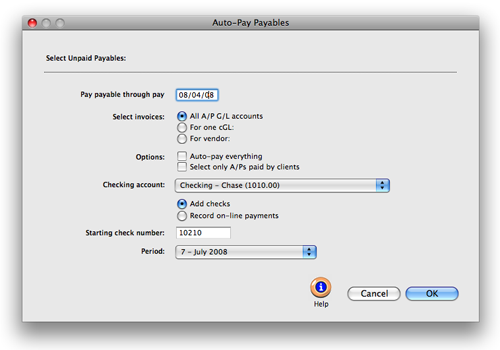
The Auto-Pay Payables window opens.

Pay everything with one click. Use the Auto-pay Payables window to write checks for all vendor payables automatically. It can save hours compared to typing checks one-by-one. |
2 Enter the pay through date.
The pay date is scheduled when the vendor invoice was added, usually
based on the vendor’s payment terms. The pay though date lets you
select payables you’ve planned to pay this week, next week, or some
other time period.
3 Select the auto-pay options.
The for one G/L option lets you auto-pay only overhead payables, for
example, instead of all payables, by entering the overhead payables G/L
number. The one vendor option lets you quickly write a check for a specific
vendor only, such as Federal Express. In both cases, invoices that don’t
fit these option won’t be selected for payment. The auto-pay everything
option selects all invoices for payment, creates check line items for
each invoice’s balance due; if unchecked, you’ll be prompted
to select which invoices should be paid (see right).
4 Enter the checking account’s G/L number from
which these checks should be written.
5 Enter a starting check number and an accounting
period,
6 Click OK.
If the auto-pay everything option was checked, Clients & Profits
cuts the checks for the selected invoices. Otherwise, the selected payables
are listed and you’re prompted to choose with ones to pay now.
To select which invoices you wish to pay
You’ll see each vendor’s oldest invoices first, helping you
decide which ones to pay now. Invoices can be sorted by clicking on a
column heading.
1 Click on the invoices you wish to pay now, then
enter the invoice’s payment and discount amounts.
If your vendor offers an early-payment discount, enter the amount in
the discount field. The discount amount is applied to the invoice like
a payment. The discount creates a credit journal entry in the General
Ledger using the discount G/L account. The discount account is copied
from your G/L preferences.
2 Click Save.
Any invoice with a payment amount will be included on the vendor’s
checks. Clients & Profits X compiles the invoices selected for payment,
totals them by vendor, then writes the checks. Each vendor gets one check.
The quantity of checks written depends on the number of vendors who got
checks. The checks are unposted, so they can be proofed, posted, then
printed.
|
|
|
|
|
Learn
more about autopay, checkbook tools & reports
in
this Clients & Profits classroom video training
session. Running time: 5:51 |
|
|
|