Free help: USER GUIDE
Home > Clients & Profits X User Guide > Accounting > Recurring Billings

|
Clients & Profits X Online User Guide |
Job billing for routine monthly charges like retainers, web hosting, account management fees, and more can be scheduled then automatically added into Accounts Receivable as unposted invoices.
Recurring billings can be a real time saver. They allow repetitive weekly, monthly, or quarterly billings to be scheduled up to a year in advance. Recurring billings can be added for one job and specific up to six different job tasks. Once a recurring billing has been added, it can be set to repeat for as many times as needed.
An unlimited number of recurring billings can be scheduled for a client. This allows any number of jobs that have routine billings to be invoiced automatically. Reports can be printed from Accounts Receivable listing the shop's upcoming recurring billings.
|
|
|
|
|
Get a complete overview of Recurring Billings
in this Clients & Profits classroom video training
session. Running time: 3:52 |
|
|
|
| How recurring billings are created When any staff member with access privileges to add A/R invoices opens the Accounts Receivable window, Clients & Profits X will check for any pending recurring billings. Any recurring billing that's scheduled to be added on that day will saved into A/R as an unposted job billing. Recurring billings are numbered automatically in sequence as they are created. These invoices can now be proofed, edited, posted, and printed like any other job billing. As the day's recurring billings are saved, they are removed from the client's recurring billings window. |
Any staff member with access privileges to add A/R invoices can add and schedule recurring billings. There are two ways to add a recurring billing:
(1) Manually add a recurring client billing for a job from the Clients window
(2) Find an existing job invoice in Accounts Receivable then repeat it.
Recurring billings can't be added for media billings, multi-job billings, retainers and advances, pre-billings, or WIP billings.
Recurring billings don't get numbered until they are saved into Accounts Receivable. At that time they are numbered in the normal sequence.
To see a client's recurring billings
1 Choose My > Clients, then find a client account.
2 Click on the recurring billings link.
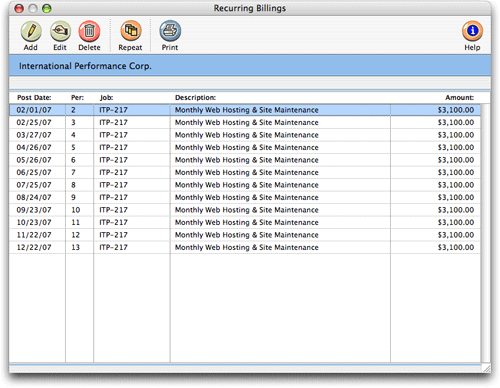
The Recurring Billings window opens, showing all pending recurring billings.

From the client's Recurring Billings window you can add new recurring billings, edit and delete pending scheduled billings, repeat an existing recurring billing again, and print a list of recurring billings. Double-clicking on a recurring billing displays its details and allows you to make changes. Individual recurring billings can be deleted by clicking once on a billing then clicking the delete button.
To manually add a recurring billing
1 Choose Setup > Clients, then click on the recurring billings link.
2 Click the add button.
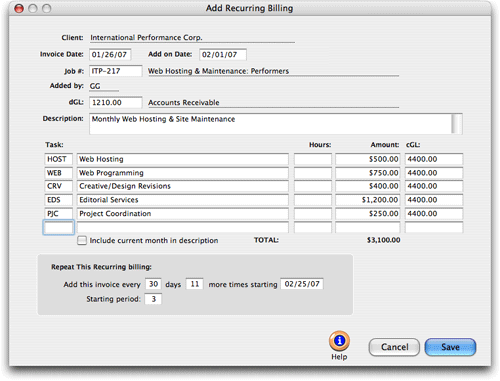
The Add Recurring Billing window opens:

3 Enter the recurring billing's details.
You'll start by adding the first recurring billing, then tell Clients & Profits X how many times it will be repeated. The invoice date will appear on the first invoice that's created automatically. The add on date tells C&P when to save the invoice into Accounts Receivable. Recurring billings must be given a job number; it will appear on all of the recurring billings. The dGL is an A/R debit account. The description explains the charges that appear on the printed invoice. A recurring billing can be distributed to up to six job tasks and cGL (i.e., income) accounts, each with its own hours billed and billing amount. The include current month in description option adds the name of the current month to the invoice's description automatically (e.g., "Web hosting fees - November 2007").
You can choose how often, as well as how many times, this recurring billing will be repeated. This allows for weekly or quarterly billings in addition to monthly billings. Both the starting date and the starting period can be changed by entering new values here. There is no limit to the number of days in the future you can add recurring billings.
4 Click Save.
The newly-scheduled recurring billings will appear immediately on the client's Recurring Billings window.
To repeat an existing job invoice as a recurring billing
1 From the Accounts Receivable window, find the job invoice you wish to repeat.
2 Click the repeat button.
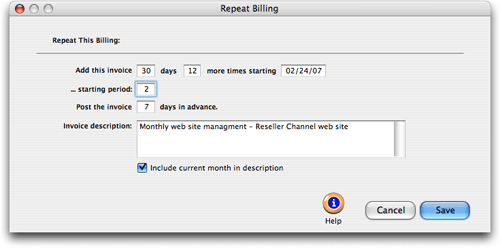
The Repeat Billing window opens:

3 Enter the recurring billing's details.
Enter the number of days between which the invoice should be repeated, the number of times it will be repeated, the starting date and starting period to begin this set of billings, and how many days before the invoice date you want them saved (i.e., saved as unposted invoices, not "posted" to the G/L).
4 Click Save.
A recurring billing record will now be saved for this client. You can review their pending billing from the
client's Recurring Billings window.
To schedule additional recurring billings
1 Choose My > Clients then find the client account.
2 Click on the From the Recurring Billings window, click once on a scheduled invoice to select it.
3 Click on the repeat button.
4 Enter the number of days between which the invoice should be repeated, the number of times the invoice should be repeated, the starting date and period to begin the recurring schedule for this invoice, and the when the recurring billing should be posted.
5 Click Save.
To edit a recurring billing
1 From the Recurring Billings window, click once on a scheduled invoice to select it.
2 Click the edit button.
The Edit Recurring Billing window opens.
3 Make your changes.
4 Click Save.
To print the Recurring Billings Pending report
The Recurring Billings Pending report lists each client's upcoming recurring billings. It's a useful way to see which routine billings have been scheduled for the next week or month (any time period can be printed). The report uses the recurring billing's post date (i.e., the date on which the recurring billings will be saved into Accounts Receivable)
Recurring Billings Pending(PDF 30.06KB)
Any staff member can print the Recurring Billings Pending report.
1 Choose Accounting > Accounts Receivable then click on the print reports button.
2 Click on the Lists report option.
3 Click on the Recurring Billings Pending report.
4 Enter the range of posting dates.
5 Click Print.