Free help: USER GUIDE
Home > Clients & Profits X User Guide > My > Calendar Entry

|
Clients & Profits X Online User Guide |
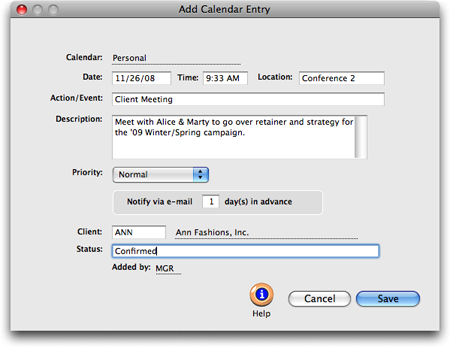
Add events, appointments, and reminders in the Add Calendar Entry window.
The Add Calendar Entry window lets you specify a time and place for each entry, so you'll know all the details of your day. With the ability to prioritize events and trigger e-mail notification, there's no more excuses for missing appointments.
When a calendar entry is added, the Action/Event appears on the calendar, while location, client, status, description, and time appear in the Day-at-a-Glance window.
The event description box, a free-form field, allows you to type in as much information as you need to describe the planned event. The pop-up priority bar lets you tag events depending on their level of importance (high, normal, or low), while the Notify via e-mail option can trigger an automatic e-mail message to remind you of the upcoming event.
The delete button will completely remove the current calendar entry from both the Calendar and the Day-at-a-Glance windows. The calendar field is automatically filled in, showing you which calendar you are entering an event for. The date will default to today’s date, but can be changed for any future date. Likewise, the time will automatically default to the current time, but you can change it to any future time. Enter the name of the place the event or activity will occur, such as the particular conference room, or office, in the location field. If the event is related to a particular client, enter the client code in the client field, along with any status note, which copies to the Day-at-a-Glance window.
To add a calendar entry1 Click on the add Entry toolbar button in the My Calendar window (or choose Edit > Add New Calendar Entry) to open the Add Calendar Entry window.
The calendar type will automatically default to the calendar that you were using before clicking the add entry button.
2 Enter the calendar entry date, time, and location.
3 Enter a short description for the entry on the action/event line.
The text you enter here will appear in on the My Calendar window as well as on the Day-at-a-Glance window, so make sure you add enough information to make the entry meaningful.
4 Enter more details about the event in the description box.
There is no limit to the amount of text you can type here, so add as much detail as you need.
5 Click on the priority pop-up menu to choose one of three preset priorities: high, low, or normal.
The priority you choose will color-code a dot next to the entry in your Day-at-a-Glance window. High priority events are red, normal are yellow, and low are green.
6 Enter how many days in advance of the event you would like to receive an e-mail reminder. (Check with your system manager to make sure that C&P Email is enabled.)
7 Enter the client code this calendar entry is related to.
A client code isn't required, but it is a good way to keep track of what needs to be done for which client.
8 Enter a status note.
The status note appears in the Day-at-a-Glance window next to the calendar entry. It could be any important information, such as “confirmed,” “postponed,” or “tentative.” Add anything here that is meaningful to you.
9 Click Save.
Editing calendar entries
Calendar entries can be edited on or before the actual date of the entry. Calendar entries from previous dates cannot be edited.
You may edit any part of the calendar entry except for the initials of the person who added it, as well as the calendar it belongs to (personal, traffic, media, etc.)
1 Click on the date in the calendar.
2 Select the calendar entry you wish to edit, then click the edit button.
The Edit Calendar Entry window will open.
3 Make your changes, then click save.