Free help: USER GUIDE
Home > Clients & Profits X User Guide > Accounting > Add Credit Card Statement

|
Clients & Profits X Online User Guide |
Clear A/P invoices paid by a credit card and add remaining charges in one step.
Adding a credit card statement has all the benefits of adding a job cost A/P invoice, where job costs & overhead charges can be added on one invoice. However, it has an additional benefit: it can pay any A/P invoice with an outstanding balance.
It’s not uncommon in today’s agency to pay off A/P invoices with a credit card for reasons such as earning credit card benefits (e.g. frequent flier miles) to addressing a temporary cash flow pinch (e.g. a client’s payment did not arrive in time to provide the funds to pay off a large A/P invoice on time).
Clients & Profits X has made this process of paying open A/P invoices with a credit card easy to do through the Add Credit Card Statement window. This process is done when adding the monthly credit card statement, not at the time the invoice was paid by the credit card. However, an A/P invoice can be marked as paid off by a credit card when it is added to expedite this process by pre-selecting this invoice as paid in the Add Credit Card Statement window and to help prevent accidentally double paying this A/P invoice during a check run (it’s taken off the list of open invoices when distributing a check or electronic payment and is marked as paid by credit card on the invoice aging). The invoices will still show up for payment under the Add Vendor Credit checkbook tool, in case an adjustment needs to be made to the invoice at a later date.
| Getting costs on a job before the credit card statement arrives. Most agencies prefer to bill their clients sooner than later. They also don’t want to have to remember to manually increase a client billing per the credit card charges that month on their behalf. By entering an A/P invoice at the time of the charge to the job ticket, both concerns are addressed. The cost is on the job ready to be billed and there is no more having to remember about those credit card charges made during the month before the credit card statement arrived. Just make sure you mark this A/P invoice as paid by credit card, and which credit card paid it, as it’s being added. |
|
|
|
|
|
Get a complete understanding of how the
Add Credit Card Statement
works, and the steps required to set-up credit cards in Clients & Profits. Running time: 7:56 |
|
|
|
To add a credit card statement
1 Choose Accounting > Accounts Payable.
2 Choose Edit > Add New Invoice > Add Credit Card Statement.
Adding a credit card statement is not the same thing as importing a credit card statement. The ability to pay off open A/P invoices is not available when importing a credit card statement. Please see the online user guide page about importing credit card statements for more information.
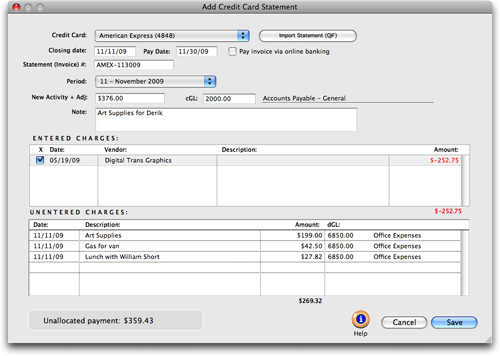
3 Select a credit card from the pull down list.
Choose the credit card that corresponds to the statement being entered. This list is generated from the Credit Cards Preferences window. When selecting a credit card it will automatically enter the vendor code and cGL account associated with this credit card. It’s recommended to have a unique cGL for each credit card. The balance of this account in the general ledger should match the credit card statement’s ending balance after posting the credit card statement.
4 Enter the statement’s closing date.
This date will also be used to auto-generate the invoice number.
5 Enter the invoice number.
Clients & Profits X will auto-generate an invoice number that’s a combination of the vendor code and the statement’s closing date, which will always ensures a unique invoice number. However, this number can be overwritten if so desired.
6 Enter the invoice period.
Choose into which accounting period this statement should go. It will default to the current accounting period in the Accounting Periods preference window.
7 Enter the pay date.
This date prints on the invoice aging as well as being used in the Auto-Pay Payables feature in Checkbook where a user can choose to list all invoices due through a certain pay date. Make sure a date is entered to allow enough time for the payment to post against the credit card to avoid a late charge or interest to be changed against the card.
8 Enter the statement’s new activity amount.
New activity includes charges, refunds/credits, and interest for the statement period. New activity does not include prior payments applied or the previous balance, which are used to calculate the statement’s new ending balance. However, the statement’s ending balance should equal the balance of this credit card’s cGL account in the general ledger after this statement is posted. The only time the statement’s ending balance will equal the statement’s new activity amount is when the card is paid off in full each month, preventing an interest charge.
9 Enter an invoice description
Any notes pertinent to this statement may be entered here, such as explanations for certain credits, late charges, etc. one may find helpful if this invoice were later reviewed by another person.
The distribution on a credit card statement includes three areas. Interest, paying invoices, and the job cost/overhead distribution.
10 Select if interest was charged on this statement.
Selecting the interest charged checkbox will open up two new fields for the amount of interest and the interest dGL account. This account is auto-entered from the G/L Accounts preferences window, but can be overwritten. Enter the amount of interest charged. Do not include the interest charge in the job cost/overhead distribution otherwise the invoice will not balance.
11 Select invoices for payment.
Clients & Profits X will auto-select those open invoices entered as being paid by this credit card. See the job cost and overhead and media accrual invoice online user guide pages for more information about this.
| Partially paying an invoice by credit card. This can be done. Add this A/P invoice with the full amount (not the partially paid amount), but do not mark it as paid by credit card, otherwise it will not show up in the distribution for payment by check or electronic payment (which will be used to pay the remaining balance of this invoice). When adding the credit card statement, select this invoice in the right side of the window (it will not be pre-selected), then enter the partial payment amount in the amount column. |
12 Enter the remaining charges.
The remaining charges on the statement had not already been entered as A/P invoices, so they will be added for the first time through the credit card statement. Enter them against job tasks and overhead expense account accordingly. When selecting a job and a task, the auto-entered markup percentage and job cost dGL account will pull from this task’s settings on that job ticket. For overhead charges, enter the job number as NONE and press tab. C&P X will move the cursor to the Net Amount field (since job tasks don’t apply to overhead costs), and after a Net Amount is added, when pressing tab it will jump the cursor to the dGL field to enter the overhead expense account (since markups also don’t apply to overhead costs).
If there were other adjustments, such as late charges, these can be entered in the job cost/overhead distribution window as an overhead charge.
If an amount needs to be applied to a PO, then it’s recommended to first enter this charge as an A/P invoice, where it can be applied to an open PO, and marked as paid by credit card so that it’s auto-selected when adding the credit card statement. Otherwise, manually close the PO after entering the credit card statement.
13 Save the credit card statement invoice.
Once the statement’s new activity amount (step 8) equals the total interest, the amount paid column in the invoice selection window, and the net amount column in the job cost/overhead distribution window (steps 10-12), then the invoice can be saved.