Free help: USER GUIDE
Home > Clients & Profits X User Guide > Accounting > Adding Overhead Invoices

|
Clients & Profits X Online User Guide |
Like job costs, vendor invoices for overhead expenses are added into Accounts Payable as they are received in the mail
Adding these expense invoices is a relatively
easy process, since you’ll be entering information right
from the invoice.
Overhead invoices are added without jobs and tasks, since they don’t
affect clients. But you lose some accountability on your profitability
reports. Unless an invoice has a job and task, it isn’t included
on profit reports -- only your agency financials. To get the best picture
of your overall profitability, you might benefit by opening and using
overhead job tickets. However, it’s faster to add as an overhead
invoice, if you don’t require that amount of detail.
An expense invoice can have one or many invoice line items. Each line
item is a separate expense account and amount. Invoice line items account
for overhead expenses, such as office supplies.
If you write purchase orders, vendor invoices can reconcile your commitments automatically as they’re added. When you enter the invoice’s PO number, details from the purchase order -- vendor, terms, and amount -- are copied to the invoice. This saves time, plus makes your job costing more accurate. Also, you’ll see at a glance if the vendor is billing you for more than you authorized on the purchase order.
|
|
|
|
|
Learn
how to add an AP overhead invoice
in this Clients & Profits classroom video training
session. Running time: 2:36 |
|
|
|
To add an overhead expense invoice
1 From the Accounts Payable window, choose Edit > Add
New Invoice > Overhead
Invoice.
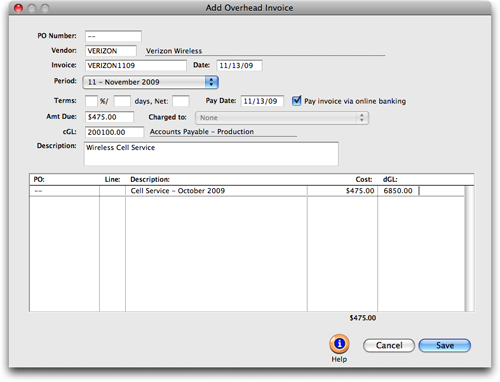
2 Enter the invoice’s purchase order number,
if applicable, and a line number.
If you don’t know the PO number, choose Lookup > Purchase Orders.
The purchase order Lookup List lists all open POs. The list can be sorted
by clicking on any column heading, making it easy to find the right PO.
Double-clicking on the purchase order copies its number to this invoice.
If you don’t write purchase orders, ignore the PO number -- simply
tab past the PO and line fields to the vendor field. The line number
is entered automatically as 1, meaning the first line item (this saves
time, since many purchase order have only one line item). The line number
is important, because it points to the exact line item on the purchase
order. It’s the only way to reconcile POs with many line items.
If
this invoice covers the entire PO, leave the PO number blank
then click the distribute to many dGLs option. This option
lets you enter every line item from the PO onto the invoice
after this window is saved.
3 Enter the vendor number.
4 Enter the invoice number, invoice date, accounting
period, and terms.
Enter the invoice number and invoice date directly from the
vendor’s
invoice. If the invoice doesn’t have an invoice number, enter a
combination of the vendor number and the date (e.g., ABC012098). This
date is important since it’s used to calculate the age of your unpaid
payables on aging reports. The invoice can be posted into any unlocked
accounting period. The current accounting period (from Accounting Preferences)
is entered automatically, but can be changed by choosing a period from
the pop-up menu.
5 Enter the invoice’s payment terms and pay date.
The payment terms are copied from the vendor account, but
can be changed. If the vendor offers an early-payment discount,
be sure to enter its percentage and days to pay; the A/P
aging and cash flash reports will calculate the invoice’s discounted balance automatically. The pay
date is day on which you’ll schedule this invoice to be paid.
If this invoice is being paid via online checking, select the "Pay invoice via online banking" checkbox. Later, you will need to record an online payment for this invoice.
6 Enter the invoice total and its credit (i.e., liability)
G/L account.
The invoice total is amount you’re being charged by
the vendor, including sales tax and shipping but not early-payment
discounts.
7 Enter the invoice’s description and debit (i.e,
expense) account.
The invoice’s description is optional, but useful for
auditing. It appears on journal entries when the invoice
is posted. The default overhead expense account is copied
from your G/L preferences or vendor, but it can be changed.
Any expense account can be used.
This invoice can be charged to many expense accounts, if needed, by clicking on the distribute to many dGLs option. If clicked, this option prompts you to enter any number of line items once the invoice is saved.
Each
vendor can have a Cost dGL account that will be used when
adding overhead invoices for that vendor. Just choose Vendors
from the Setup menu and click on the Acct Info palette button.
8 Click Save.
Once the invoice is saved, it can be proofed, changed, or
deleted at any time before it is posted. The invoice doesn’t update vendors
or the General Ledger until it is posted. Posting creates debit and credit
journal entries and increases the vendor’s balance. Unposted invoices
don’t appear on cost, aging, or accounting reports.
Posting AP Invoices
Posting a vendor invoice updates job tickets,
job tasks, the vendor account, and the General
Ledger.
When invoices are added, they are unposted.
Unposted invoices can be easily changed,
letting you edit cost amounts before the
account balances are updated. Posting is a methodical process that updates
vendors, jobs and tasks, and the General Ledger. The process is the
same whether you’re
posting one invoice or many invoices. For
more information on posting AP invoices, click here.