Free help: USER GUIDE
Home > Clients & Profits X User Guide > Production > Opening New Jobs

|
Clients & Profits X Online User Guide |
Any new work should be opened as a job ticket, as it happens
A job ticket can be opened anytime
after it is conceived, and certainly before the
work begins. It’s important to open new jobs
as soon as possible, since purchase orders and
time can’t be tracked without a job number.
Anyone can open a new job ticket if they have the access privileges. Adding
a new job is easy: all someone needs to know is the client number, job name
or title, and the work’s description or specifications. Everything about
a job ticket can be changed later, so there’s no real requirement to enter
all of its details now.
The work you do is often similar to jobs you’ve done before, such as a
brochure or an annual report. These types of jobs often have the same details
and options. Spec sheets offer an easy way to automate entering this common
information on new jobs. So when a new job is added, it can be given a job
type/spec sheet.
Existing jobs can also be cloned into new jobs. Cloning makes an exact duplicate of an old job, including its estimates but not due dates, status, or cost and billing amounts. Cloned jobs get the next automatic job number. To clone a job, choose Edit > Clone instead of Edit > Add New Job.
Job tasks can be added when adding a new job ticket, or added later. To save time, spec sheets can be set up with templates. The template, which is based on a job type, contains a standard set of tasks. When a job is added with a spec sheet, its tasks are copied from the template automatically. Since tasks are used for estimating and scheduling, using a template saves some time. Plus, it makes your jobs more consistent.
|
|
|
|
|
Learn how to open new job tickets
in this Clients & Profits classroom video training
session. Running time: 5:01 |
|
|
|
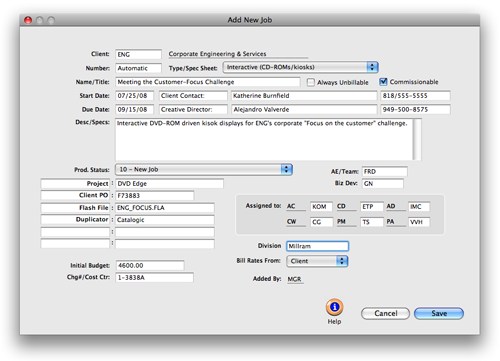
To open a new job ticket
1 From the Job Ticket window, choose Edit > Add
New Job.
The
Add New Job window opens.
2 Enter the client number.
The job’s client should be the one who is most responsible for either
paying for or approving the work. The job is then numbered automatically.
3 Enter the job number.
A new job is numbered automatically, but you can enter your own number. A job
number must be unique, so the same number can’t be used twice. Otherwise,
the job number can contain any combination of ten letters, numbers, and characters.
It can’t exceed 10 characters.
Jobs are automatically numbered New jobs are numbered automatically, so there’s no need to maintain a separate job book with job numbers. Jobs can be numbered automatically based on your job number settings in Preferences. Automatic job numbers can contain client numbers and the year. If jobs are numbered sequentially by client, the next number will be copied from the client account. Otherwise, the next number will be copied from the system. |
The automatic job number can be changed. To enter your own number, type in your new number over the automatic number. Using your own custom number, however, may interrupt the automatic numbering for upcoming jobs.
If your job number appears as Automatic, your job numbering preference is set to always prevent duplicates. If enabled, this preferences causes the job to be numbered when it is saved.
4 Select a job type/spec sheet.
Spec sheets automate jobs. The job type’s spec sheet, including its estimate disclaimer, description, and tasks, can be copied to new jobs. Double-clicking on a spec sheet copies its settings and traffic milestones to the new job automatically. When the job is saved, the spec sheet’s template (i.e., its tasks) will be added automatically.
Jobs don’t need spec sheets. If this job doesn’t need a spec sheet, click the Don’t Use Spec Sheet button.
5 Enter the new job's remaining details:Name/Title The name/title is a short description of the job. It appears almost everywhere on windows, forms (like the estimate and invoice), and printed reports.
Start Date, Due Date Start date can be the date the job was opened, approved, or the date work was started. Due date can be the date of the job’s final approval, delivery, printing, or some other important date. Both dates appear on production windows and job reports.
Client Contact, Agency Contact The client contact is the person who will be primarily responsible for approving this job or tracking its progress. The agency contact is the person inside the shop who will be most responsible to the client, such as the account executive.
Desc/Specs The description/specifications field contains a complete description of the job that your client should see on estimates and invoices. This text appears on the top half of the printed estimate, above the tasks. Although you can enter up to two pages worth of text, a long description will cause the estimate to print onto two or more pages. Specific, detailed printing and creative information about this job should be added on the job’s Print Specifications or Work Order windows.
Production Status The production status classifies the job based on its progress. Status codes are customizable, and you can have dozens to better track your jobs. All jobs get the default “new” status when they are opened. You can change the new job’s status by selecting a status code from the Status Lookup List.
AE/Team The person or team who's most responsible for managing this job is entered here. Later, job reports can be printed showing all of the jobs opened for any AE/team. You can enter an AE/team name for each client, showing who will be responsible for the client's work. The client's AE/team is copied to new jobs automatically, but can be changed.
User Fields User fields provide an easy way to include specialized information about a job. These fields are completely customizable, and appear on estimates and some job reports. The first two fields, Project and Client PO, are system settings from Preferences. Jobs can be found by these two fields, so they are the most useful. The other user fields can contain printing information (e.g., color, paper stock), client accounting information (e.g., brand, form number) or agency information (e.g., location). There are two parts to the user fields: the left-hand column contains the field labels (they appear in bold); the right-hand column contains the values you enter.
Initial Budget The job’s initial budget is for internal use only. It appears on the printed Job Ticket form to give the production people a guideline for estimating. It lets the account exec enter a ballpark idea of what the client wants to spend on this job. The client doesn’t see the initial budget.
Charge Number/Cost Center The charge number/cost center is provided by the client, and is used by their accounting department. It appears on printed estimates and invoices.
Traffic Assignments Traffic assignments are the key production, creative, and account service people responsible for managing the job. The initials of the job’s account coordinator, creative director, art director, copywriter, etc. are entered into the assigned to fields, which are used by production and traffic reports. The traffic names themselves are a customizable system preference.
Profit Center A job can be opened for a specific profit center. Jobs can be tracked by profit center, which can be different departments, divisions, or client groups within the shop. Job reports can be printed later by profit center. This option lets you group jobs by profit center.
Bill Rate The bill rate setting determines which billing rates (i.e., task, staff, or client) will be applied to this job’s time. The default rate setting is copied from Preferences but is replaced by the spec sheet’s setting, if applicable. The setting can be manually changed using the pop-up menu. It will be applied to every task added to this job.
6 Click Save.
Once the job is saved, it is available instantly to anyone using Clients & Profits. This job will appear on job reports, job lists, and job summaries the next time these reports are printed.
The next step is adding tasks to this job ticket.
To add tasks to a job ticket
If the job was added with a job type/spec sheet, the tasks from the spec sheet will be copied to the new job automatically. Otherwise, you'll need to add tasks to the job. Job tasks are needed before the job can be estimated or scheduled, but can be added later. Tasks can even be added while you’re working elsewhere in Clients & Profits X. Once a job has tasks, purchase orders can be added and time can be tracked on time cards.
The Add jobs tasks window allows you to add tasks to a new job ticket once it's been saved. Like job tickets, changes can be made to job tasks at any point during the job's life -- including after the job is closed. The changes you make to job tasks take affect when they are saved.