Free help: USER GUIDE
Home > Clients & Profits X User Guide > Setup > Add Vendor Account

|
Clients & Profits X Online User Guide |
Everything you'll need to know about a vendor contact is recorded in the Add Client Contact window, including their e-mail addresses, phone and fax numbers, address, and more.
Client contact information is used throughout Clients & Profits X. Client information is used for sending Sales>Maker letters and e-mail, as well as copying key information -- the contact’s name, e-mail, and phone number -- to the Clients window. The additional fields included in the Add Client Contact window are designed to help you jot down lots of detail so you can better serve your client.
To find a vendor
To find a vendor, choose File > Find Vendor, enter the vendor number, then click the Find button. You can also find vendors by sequence (i.e., the order that they were added into Clients & Profits X) or by company name using the Find Vendor By pop-up menu. To browse through the staff database, click the Next and Previous toolbar buttons.
To add a new vendor
1 Click the add button or choose Edit > Add New Vendor.

2 Enter the new vendor’s number, name, address and other details then click Save.
New vendors are not automatically numbered. Any kind of 10-character number or code can be used.
To edit a vendor’s name and address
1 Click the edit button, or choose Edit > Edit Vendor.
2 Make your changes, then click Save.
Anything about a vendor -- except its number, account balance, and purchase history -- can be changed at anytime.
To delete a vendor
Vendors without any activity can be deleted at anytime. A vendor with an outstanding balance can’t be deleted; if so, the vendor’s unpaid invoices wouldn’t have an account to update. A vendor with no balances, but paid invoices, can’t be deleted either. If so, the vendor’s invoices -- although paid -- wouldn’t know to which account they belong (and probably neither would any user). So for better accountability, only vendors without activity can be deleted.
1 Choose Edit > Delete.
A vendor with invoices or POs can’t be deleted. Instead, an old vendor can be made inactive by choosing Edit > Edit Vendor then unchecking the Active checkbox. Inactive vendors don’t appear on lookup lists or vendor reports and can’t be used for new purchase orders or A/P invoices. Inactive vendors can be used again by simply checking the Active checkbox.
To edit a vendor’s notes
The vendor’s notes describe something about a vendor. These notes don’t usually appear on standard C&P reports, but can be used on custom reports.
1 Click the Notes link.
2 Enter the vendor’s notes then click Save.
To edit a vendor’s contacts
The names and phone numbers are tracked for each vendor using the Vendor Contacts window. They’re completely customizable, as well as optional.
1 Click the Contacts link.
2 Enter the vendor’s contact names and phone numbers, then click Save.
To see a vendor’s statistics
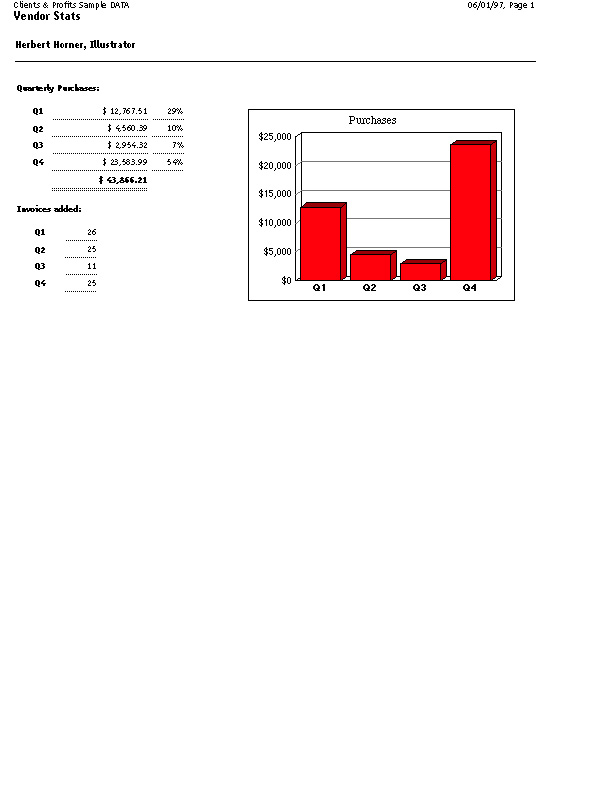
The Vendor Statistics window displays the total purchases (including the number of invoices) for each quarter of the current year. To see last year’s totals, choose Last Year from the Show pop-up menu. Clicking the Graph button calculates the quarterly totals and draws a graph. Clicking the Print button prints a hard-copy version of the stats window.
1 Find a vendor, then click on the Stats button.
|
Tracking vendor purchases. A graph comparing a vendor’s quarterly purchases identifies trends that can be useful for negotiating better terms. The graph’s totals are calculated from posted A/P invoices. Purchases from this year and last year can be compared using the “show” pop-up men |
To print a vendor’s account ledger
The account ledger shows a detailed listing of the vendor’s invoices. The report shows at a glance just what you’ve purchased from a vendor. It can be a helpful report, giving you valuable financial data that you can use when negotiating better prices.
1 Choose File > Print Account Ledger.
To edit a vendor’s account information
1 Click the Acct Info link, make your changes, then click Save.