SUMMARY: This tech note will
help you set up cross-platform sharing of the Clients & Profits
database on either Windows Server 2003 or Windows 2000
Server. |
THE CLIENTS & PROFITS HELPDESK
DOES NOT PROVIDE SUPPORT FOR SERVER SETUP. Installing
and configuring your server hardware and operating
system can be technical, so you should have access
to a computer expert who is familiar with networking
and server operating systems. |
NOTE: The following is a step-by-step guide to setting up cross-platform
file sharing for Clients & Profits on Windows Server 2003 from a clean
install of the operating system. Different configurations and/or
proprietary software solutions may change some of these steps.
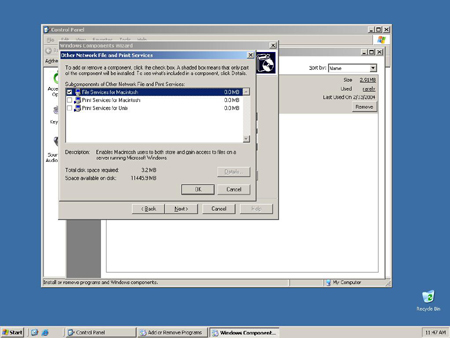
First, you'll need to install File Services For Macintosh.
1 Open Control Panel
2 Open Add or Remove Programs
3 Choose Add or Remove Windows Components
4 Scroll to Other Network File and Print Services
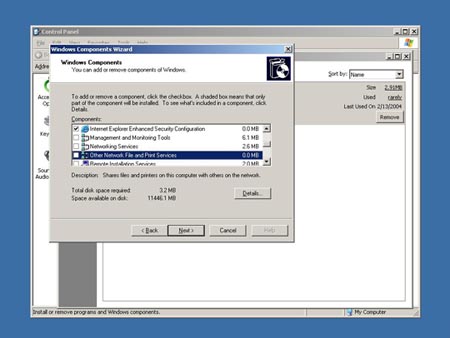
5 Check File Server For Macintosh (then
ok, then next, install will procede)
6 Click Finish
7 Close Add or Remove Programs
Secondly, you need to set up a folder (or two) for
cross platform file sharing.
1 Open Control Panel > Adminstrative
Tools.
2 Open Computer Management.
3 Expand Shared Folders and click on Shares.
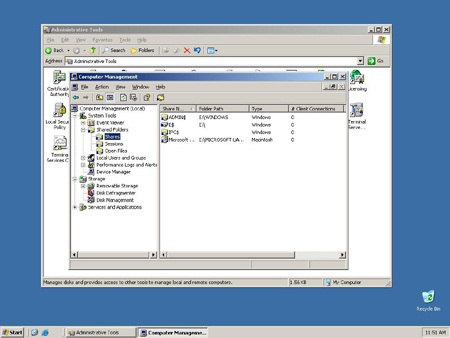
NOTE: The Default share for the Mac is named "Microsoft UAM Volume". You
can either add a PC share volume to this, or you can set up another folder
to use as the shared volume. Both of these options involve creating a new
share.
4 Right click in the white space below the list
of shares and select New Share. (This will start the Share A Folder
Wizard).
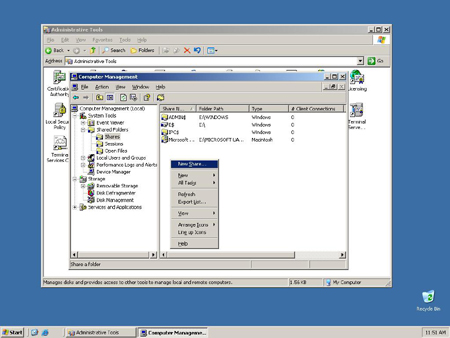
5 Click next and choose the path to the
folder you wish to share and click next.
NOTE: If you wish to use the Microsoft UAM Volume, then navigate to that
folder here. If you are creating a new share (both Mac & PC), then
navigate to that folder here (the folder must already exist).
6 If you are sharing the UAM Volume, then you can just click next again
(leaving the default Windows Users sharing settings here). If you are
creating a new share, then you'll also want to check the box for sharing
for Apple Macintosh Users and designate the the share name (if you want it
to be different from the Windows share name, but that's not recommended).
7 Click next. This is the wizard's permissions window. You'll have four
options here, but we'll talk about security later, so just choose
Administrators have full access; other users have read and write access.
8 Close the windows.
Third, you'll need to configure your Security and Password
Authentication settings.
NOTE: Security is often the area of configuration
that gives people the most problems. Here are some steps and tips
that should keep the frustration level as low as possible.
NOTE 2: Mac and Windows machines handle security
and authentication differently. Consequently, there are several
different areas, both on the mac and the PC, that we'll need to
take a look at.
1 Windows user permissions can be edited either
by looking at the folder in the Windows Explorer (right click on
the folder in Windows Explorer and choose Properties, the select
the Security tab) or under the share properties in the Computer
Management console.
2 Give everyone full control of the folder and
the database.
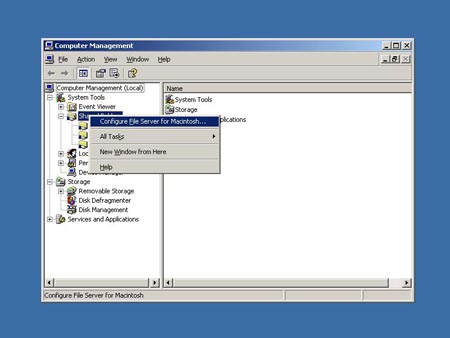
3 Configure the Macintosh authentication
and permissions Under Computer Management.
4 Right click on Shared Folders and choose Configure
File Server For Macintosh.
5 If you wish to change the name of the
server that Mac users will see, do it here.
6 Under security, under Enable Authentication,
choose Apple Clear Text.
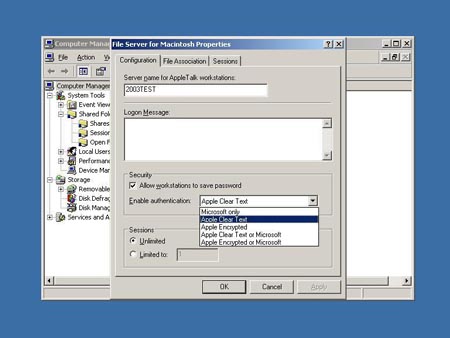
NOTE: It is common to allow users to save
passwords, so they don't need to log into the server every
time they start their computer, though this is not 'needed'
for sharing to work properly.
7 Close the File Server for Macintosh Properties
window.
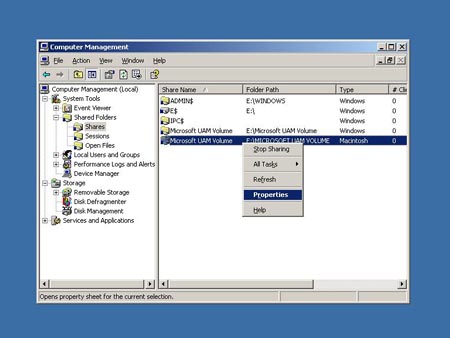
8 Back in the Computer Management window, click
on Shares, then right click on the UAM volume share that is labled
Type Macintosh (there is a column that tells what 'type' of a share
the listed share point is classified as) and choose Properties.
9 When this is open, you will see the General
Properties, under SFM Volume Security, by default the box "This
volume is read-only" is checked. Make sure you uncheck
this and click apply.
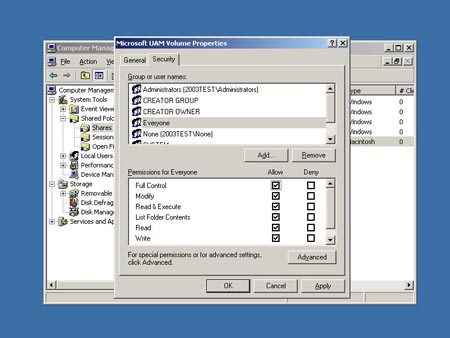
10 Select the security tab.
11 Make sure to give all Mac users that will access
the Clients & Profits database Full Control over this share.
12 Click ok.
The volume should now be accessible from both Macintosh and Windows computers.
Final considerations
OS X permissions Note: The OS X permissions work a little
differently than others on a file level. Sometimes if you are not
able to access the database with both Macs and PCs at the same
time, you may need to copy the database to the local hard drive
of an OS X computer. Go to Get Info on the file and look under
Ownership & Permissions and Details. Here you will need to set
all access to Read & Write. Close the Get Info window and
copy the database back to the UAM volume on the file server.
If you're serving your Clients & Profits database using OS X Server, make sure than both oplocking and strict locking are disabled. Apple does not recommend these settings be enabled for cross-platform sharing. For more information about changing settings of an SMB share point, see this tech note from Apple. For additional information regarding file locking with SMB share points, Apple has also provided this tech note.
TCP/IP protocols: Under the above setup,OS X-based Macs connect to the database
using AFP (the Apple Filing Protocol). Though OS X offers the ability to mount
servers using Samba (or SMB, Server Message Block), they will need to use AFP
to connect to a C&P database. Windows systems use SMB exclusively and OS
9 uses AFP exclusively.