Free help: USER GUIDE
Home > Clients & Profits X User Guide > Accounting > Work In Progress Billing

|
Clients & Profits X Online User Guide |
WIP billing lets you invoice a job's unbilled costs for any time period.
The WIP invoice bills job costs -- time, vendor
purchases, expenses, and internal charges -- for any week, month,
or other time frame of your choosing.
Adding a work in progress billing is easy: all you need to know is the
job number and a date range. When you enter a range of dates, Clients & Profits
X lists all of the job's unbilled costs that were added during that time
period. You'll have a chance to edit the billing amounts (and hours,
too) for each cost. But while you see the individual time entries, vendor
purchases, out of pocket expenses, and internal charges when adding the
invoice, your client will only see the total billings for each task.
That's because Clients & Profits X combines the job's billed costs
together by task when the invoice is saved.
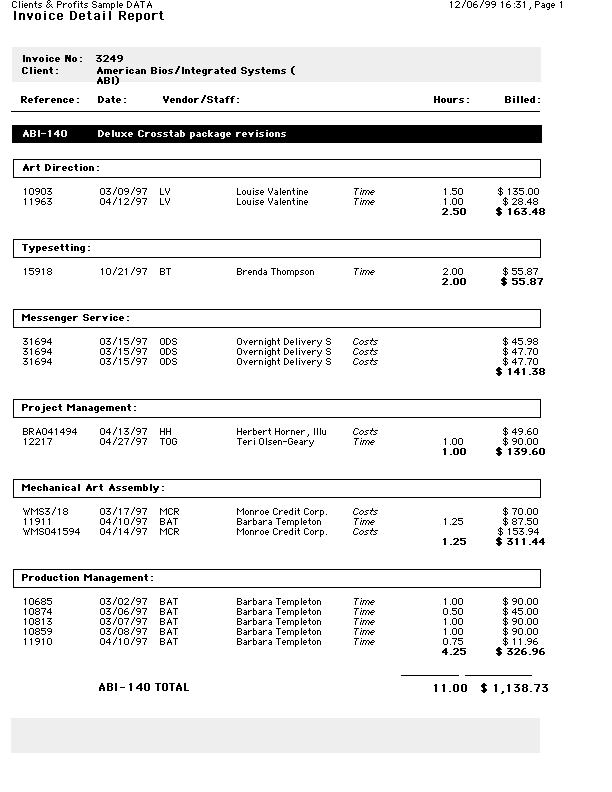
You can attach a detailed list of billed costs to the invoice by printing the Invoice Detail Report at the same time you print the invoice.
To add a WIP billing
1 From the Accounts Receivable window choose Edit > Add New Invoice > WIP Billing.
The Add WIP Billing Invoice opens, prompting you to enter the work in progress invoice's details.

2 Follow the remaining steps to continue adding a WIP billing:
Invoice number New invoices are numbered automatically (using the invoice number entered in Preferences). Invoices are numbered sequentially. You can change the invoice number by selecting it and then entering your own number. You’ll be notified if the invoice number has been used before.
Job number The last-used job number is entered automatically as a time-saver, but can be changed. If you’re not sure about a job number, leave the field blank then press Tab to open the jobs lookup list. Double-click on the job to copy it to this invoice. You can enter any job number you wish, including jobs that are new, in progress, or closed.
If the job has a status alert, you’ll see it as you tab past the job number field.
Client number Every invoice is billed to only one client. This client is the one who will eventually pay for the invoice. The client number is copied automatically from the job, but can be changed -- which lets you bill the job to a different client. Tabbing past the client number copies its name, payment terms, and sales tax information to the invoice. Any active client can be used on an invoice.
The job ticket and invoice can have different clients. There may be instances where several departments of a large corporation open jobs, but invoices are billed to a third-party. This third-party, such as the corporate headquarters, would be added as a separate client and get all of the billings.
3 Enter the invoice date, due date, accounting period, the client’s PO number, terms, and charge number.
Debit account The default A/R account, which is copied from Preferences, can be changed to a different G/L account. This account is debited for the invoice’s total, including sales tax, when the invoice is posted.
Dates Enter a range of dates for which the job's unbilled costs should be billed. The range of dates can be a week, a month, a quarter, or any period of time. When you tab out of the date field, Clients & Profits X will select the job's unbilled costs that were added during the time period, sorting them chronologically (oldest first) by task. Unbilled time entries are selected by work date (i.e., the date on which the work was performed), while vendor purchases are selected by invoice date. Expenses and internal charges are selected by date added.
Check the roll up billing amounts by task option is you want the client the see less detail on their printed invoice. The roll-up option gives you the most flexibility in billing, since it selectively combines several tasks into another.
Billing amounts If needed, enter a different billing amount or hours for each of the job's costs. Before the invoice is saved you have a chance to tweak a billing amount for one or more job costs. Changing the billing amount will only affect the client's invoice -- the gross amount on the cost is unaffected.
Notes Enter the invoice’s notes. The work you’re billing can be fully explained in the invoice notes. These notes, which appear near the top of the printed invoice (above the billing amounts), can summarize what’s being billed on this invoice.
10 Click Save to save this WIP billing invoice.
Once the invoice is added and saved, it must be posted. Posting makes the invoice permanent, updating the job ticket, the client account, and the General Ledger. The invoice can be proofed before posting, then changed as needed (e.g., amounts added or removed, descriptions changed, etc.).
|
|
|
|
|
Learn
more about WIP billing
in this Clients & Profits classroom video training
session. Running time: 1:40 |
|
|
|