Free help: USER GUIDE
Home > Clients & Profits X User Guide > Accounting > Checkbook

|
Clients & Profits X Online User Guide |
Clients & Profits X can write and print checks for vendor invoices, job costs, overhead expenses, and employee advances.
Clients & Profits X keeps a complete, detailed check register for all of your bank accounts -- and can help you easily reconcile the accounts each month. Checks are numbered automatically as they are written. Different checking accounts should have different numbering sequences, which you can easily set in the Chart of Accounts.
You can write checks any time. You can write one check at a time, or many checks at once. Checks are written individually for a vendor and unpaid invoices. Every check you write, including hand-written checks, should be added into Clients & Profits X. A check can be written as a vendor payment on account, a job cost, or an overhead expense. This means, for example, the same check can’t combine payments to vendors and overhead. Checks can be written as direct disbursements for job costs, charging one or more jobs and tasks for pre-paid costs like printing, postage, and delivery -- including markups. (Click Checkbook Features for more checkbook features.)
|
|
|
|
|
Get a complete overview of the Checkbook in this Clients & Profits classroom video training session, with C&P Trainer Mindy Williams. Requires Apple Quicktime 7.0 or greater. Running time: 2:26 |
|
|
|
To use the checkbook
1 Choose Accounting > Checkbook.
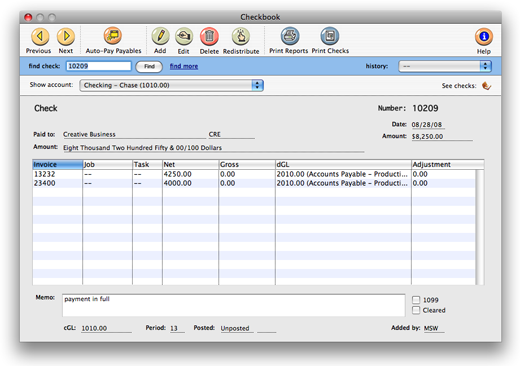
The Checkbook window opens, displaying the last added check.

Use the Checkbook window’s toolbar buttons to add, edit, delete, and print checks. Clicking on a button is the equivalent to choosing a File or Edit menu command.
Click the next or previous buttons to select the next or previously added check. You can find a check by entering its check number then clicking the find button. (To search for checks by vendor, payee, or check date click the find more link then follow the prompts.) As you browse from check to check, Clients & Profits X keeps track of the last 25 checks you've viewed. You can jump back to a previously-displayed check using the history pop-up menu.
To write a batch of checks for unpaid payables
The Auto-Pay Payables option makes writing checks for many vendors even easier. This command pays unpaid payables automatically, based on a date. Clients & Profits X finds the unpaid invoices, then automatically writes the check -- one for each vendor. These checks are unposted, so they can be easily proofed and edited before posting. Click here for step-by-step instructions.
To write a check
Checks can be written individually to a vendor to pay one or more unpaid payables, job costs, overhead expenses, or for employee expense advances. Click on a link below for step-by-step instructions:
Writing vendor checks
Writing checks for job costs
Writing checks for overhead expenses
Writing checks to employees for expense advances
To edit a check
A check can be changed any time before it is posted. Click here for step-by-step instructions. The check's description, payee address, and more can be edited by clicking the Edit button. A single check line item can be edited by double-clicking on an amount.
To redistribute a check to different jobs, tasks, and G/L accounts
Redistributing a check erases the check’s line items, letting you decide again how the check amount should be split between invoices, jobs, or expense accounts. For step-by-step instructions for redistributing checks, click vendor payments or job costs.
To delete a check
Once a check has been posted, it can’t be deleted. Instead, it needs to be voided. Once a check is deleted, it's check number can be reused.
1 Find the unposted check you wish to delete.
2 Click the Delete button (or choose Edit > Delete Check).
To print checks
Checks are printed using industry-standard, pre-printed check stock. These checks, which are easily ordered from Deluxe Business Forms, work best with Clients & Profits X. Checks can be printed individually, or in batches by check number. Click here for step-by-step instructions. See also the Checkbook FAQ.
To print checkbook reports
Cash disbursement reports summarize checks, showing what you’ve paid to vendors (using the payee field), jobs and tasks, and G/L accounts. Click here for step-by-step instructions.
Adding a beginning balance to your checkbook
Whether you're migrating to Clients & Profits from a previous system or starting fresh, adding a beginning balance to your checkbook can be done by adding your credits and debits as a Journal Entry in the General Ledger. Click here for instructions on entering Journal Entries.
Before adding the Journal Entry however, there are a few things that need to be setup prior to this taking place. Accounting periods need to be set up in preferences, as well as your Chart of Accounts. You'll also need a trial balance, or a trial balance sheet from your old system.
Your beginning balance Journal Entry can have virtually an unlimited number of debit and credit entries. The entry won’t be saved unless it's total debits and credits equal. This new Journal Entry will be unposted, so it can be proofed and edited before updating the general ledger and appearing as the beginning balance in your checkbook.
Using the check tools
These useful tools let you renumber a batch of misprinted checks, void one or more checks, add vendor credits, and more. Click on a link below for step-by-step instructions:
Void Checks
Renumber Checks
Add Vendor Credit
Reconcile (bank reconciliation)
Print 1099 Report/Forms